Category Archives: GF Cooking

My attempts to learn how to take better care of myself and still have a tasty meal :P

Slow Cooker Gluten Free Lasagna

Yesterday I made lasagna in a the slow cooker. I have been told that this works out really well and based on how the au gratin potatoes came out I’m more than willing to attempt this. Heck I even picked up a couple of slow cooker cook books with non-traditional recipes from the library to play around with.

My sauce is really not much more than a down and dirty red sauce made from diced tomatoes, onions, garlic, meat, and basic Italian seasonings. You could use a commercial sauce if you don’t want to make your own. I really like using beef/pork blends even though today its plain beef as well as mixing up my cheese selections so for this dish we are using a Colby/Jack and a 90% lean beef. I also used Tinkyada gluten free lasagna noodles. These noodles held up well, but had they cooked any longer they would have been mush.

Lasagna Plated

The finished meal. It was a bit dry, but excellent non the less.

I was very happy with how this turned out and I’m pleased with this method of cooking lasagna.  I really love the thought of not turning on the oven in the summer or at all for that matter.

I look forward to trying this lasagna with a bechamel (white) sauce. Nummm.

Divider Bar

Slow Cooker Gluten Free Lasagna

Prep Time: 60-ish min
Cook Time: 3 to 4 hours
Total Time: 4 to 5 hours
Servings: 8-10


Ingredients

  • 1 box Gluten Free Lasagna Noodles, ucooked

Sauce:

  • 1 lb Ground Beef
  • 3 (14oz) cans Diced Tomatoes
  • 4 Garlic Cloves, smashed
  • 1 small Onion, cut in half & thinly sliced
  • 1 packet of Sugar/Stevia/Splenda
  • pinch of Cinnamon
  • pinch of Coriander
  • Red Pepper flakes to taste
  • Herbes de Provence to taste

Cheese Filling:

  • 1 (32oz) container of Ricotta cheese
  • 16oz Colby/Jack, grated with 6oz set aside
  • 1/2 TBLS Celery Seed
  • 1/2 TBLS Dill
  • 2 Eggs

Directions

1. Sauté onions and garlic in a frying pan over med-high heat till onions start to become soft and translucent. Add the beef and cook till meat is done. Drain off any excess grease if you choose. Add in tomatoes and seasonings, simmer to the sauce starts to cook down and get thick. Remove from heat.

Lasanga Sauce

Still a little wet, but just about there.

2. While sauce is cooking mix all filling ingredients together in a bowel.

Lasanga Cheese Eggs

This picture was not really necessary to the instructions, but it looked cool.

Lasanga Filling

Ricotta, eggs, seasonings, and Colby/Jack cheese.

3. Start assembling your lasagna by placing just enough of the sauce in the slow cooker to cover the bottom.

Lasagna Meat Layer

Just covered.

Cover the sauce with a layer of uncooked noodle strips.

Lasagna Large Noodle

If the noodles are to long for your slow cooker, but break them down to size.

On top of the noodles you want to spread out a layer of the cheese filling.

Lasagna Cheese Layer

Spread out as thick or thin as you like.

Next add a layer of the meat sauce. Just spread it around till it covers the cheese. Repeat the layers one or two more times as desired. Top with reserved cheese.

Lasagna Cheese Top

Top with the cheese you set aside.

Cover with lid and set temp to low. Cook for 3-4 hours, till noodles are tender.


Lasagna Done

Nice and gooey cheese top.

Tips & Variations

  1. Your cooker may not be big enough to lay out one whole noodle, thats ok, just break them down to size and fill in as much as you can. Its lasagna, not rocket science.
  2. I use a large serving spoon to scoop filling and the back of the spoon to spread it across the noodles. The filling is thick and moves the noodles about a little, I found that this was minimized if you dropped the filling the ‘seams’ where two noodles met.
  3. This dish is great for variation, try different meats, cheeses, vegetables or seasoning styles. Just add the vegetables in layer rotation. Other goodies can be placed it the sauce as well.

3 Comments

Filed under GF Cooking, Recipes, Sunday Rituals

Bean Soup

When I posted about my new little slow cooker yesterday, I never expected the response I got. Coline over at Coline’s Blog (go visit her, I’ll wait) asked if I could share some recipes for using a slow cooker.  I would be happy to do that.  I had been thinking about posting some recipes, so the request goes along way towards pushing me in that direction.

I have no ‘formal’ recipe for my bean soup, it really is a free for all kind of meal.  I will try to present it here as a basic structure that can be changed around when different ingredients are available.

Slow-Cooker Easy Bean Soup

Prep Time: 10-20 min
Total Time: 4-6 hours
Servings: 1-3

Ingredients

  • 1 can (14 oz) vegetable broth
  • 1/2 can (7 oz) of Black Beans, rinsed
  • 1/2 can (7 oz) of Great Northern Beans, rinsed
  • 1/4 tsp salt
  • 1/4 tsp Herbes de Provence
  • pinch of pepper (to taste)

Directions

In 1-2 qt. slow cooker, mix all ingredients and add broth to just covering beans. If you want more ‘soup’ add more broth. Cover; cook on Low heat 4-6 hours. You may need to adjust this time based on your cooker and choice of beans.

Tips & Variations

  1. Something I love about bean dishes is that there is a lot of variation that you can try.  I used Black & Great Northern in the list above as they both hold up well and compliment one another in flavor and visually (light & dark).  You can use any one or more beans of your choice. Experiment.
  2. If you have a larger slow-cooker, this dish can be doubled/tripled as necessary. The more you do it, the more you will get a feel for it. Check in on your soup till you find tender level of your beans you like and note the time it took.
  3. Chicken broth with chicken thighs/thigh meat for additional flavor.
  4. Add seared stewing meat (beef or veal) for a hearty meat dish.
  5. Any combination of onion, celery, carrots or potatoes adds depth of flavor.
  6. I love to use pintos, cannellini, kidney, and black eyed peas as well in place of great northern.

2 Comments

Filed under GF Cooking, Recipes

Au Gratin Potatoes… in a Crock-Pot!

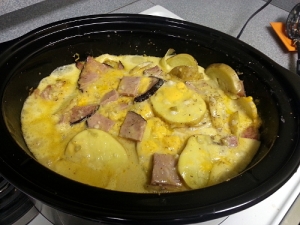
Yea, ok I know how that sounds, but I did tell my Sunday group we were gonna have au gratin potatoes.  I did not feel so great last night, so a dish that does not need to be closely monitored was looking appealing (I feel better today, but decided to carry on as planned and see what happens).

It was initially going to be ham and fried potatoes with onions, when a friend of mine suggested cheesy potatoes.  I was like ‘hmmmm’ and lunch was born.  We started with 3-5 med. sized potatoes (I used some Yukon Golds as I like to leave the skins on), sliced kinda smallish, but not thin.  This is when I love to whip out the Mandoline as it makes potatoes and onions a snap.  To this we added 2 cups of shredded sharp cheddar mixed with onions and seasonings to taste.  I mixed that up with the potatoes and tossed it all into the pot and started on the sauce.


Crock-Pot Potatoes

Waiting for sauce.

Now, before we get to far into this rambling description of what is sizing up to be a pretty tasty lunch, let me tell you that I did NOT make a white sauce or anything for this.  I am using a cheap and dirty recipe that uses cream of mushroom/chicken/cheddar cheese soup as a base.  This worked well for me today so were trying it.  So I mixed the soup up with water (yea, I would have preferred milk as well, but I did not have any) and poured it over the top.  Set the cooker to high and went back bed. 🙂

Two hours later I went down to check on it and it was looking pretty good. The cheese was melting nicely and the potatoes were covered and bubbling away.


Crock-Pot Potatoes

As the the cheese starts to melt into the sauce.

Two hours after that and I was starting to get a little worries that it was not going to thicken up.  I know it would never be the kind of thick that a baked dish would be, but I did want it thicker than soup.  I was wondering if I had added to much waster to thin out the soup.


Au Gratin potatoes.

Very think and watery.

Another hour after that. however, it thickened up and got creamy (it seems potatoes can stay hard for hours and be done in minutes).  The potatoes were soft without being mushy and the ham was tender and juicy. Mmmm.


AuGratin Potatoes w Bread

Au Gratin Potatoes w Bread, plated to serve.


3 Comments

Filed under GF Cooking, Sunday Rituals

Easter

Happy Easter everyone. If you observe this day, I hope it is filled with family, joy and good food.

Today we had a veal stew. I know its not quite lamb, but its what I had. A spoonful of horseradish sauce on top added just a little kick. Along with the stew my upstairs neighbor made deviled eggs and  Jello jiggles. We also had fancy dinner rolls and gluten free bread to dunk in the stew.  Strawberry shortcake with real whipped cream wrapped it up for desert.

My Sunday group are all homebound this year, so having our own Easter dinner at lunch (linner) was so nice.  They had a really good time as we listed to music and played games and spent quality time together. Isn’t that what its all about?

2 Comments

Filed under GF Cooking, Images

Homemade Hummas

I LOVE hummus.  I love tzatziki as well, but thats another post. 🙂

Today I’m making homemade hummus.  This is actually a lot easier than I thought.  What could be easier than grinding up Garbanzo beans and tahini and a few spices?

You can use canned or dried beans.  Canned are quick and easy, but I’m told that dried beans give a more robust flavor and texture.  While this maybe be true ( I will do a comparison  with canned beans later), there is a little more prep and panning involved.

So I opted for the dry bean method.  With dried beans you do need to soak them overnight, so its not like “ohhh lets make hummus tonight’.  Hehehe…. So I put my shriveled up beans in a pot last night and let them soak for 12+ hours.  Then you drain them and add fresh water and boil them for about and hour till they ‘pinch mush’ in your fingers.  I just drained them and will let them cool to room temp.  After that its just a turn in the food processor with the nummy spices and whoo-hoo its lunch!  You should smell my kitchen… warm and nutty smelling.  I tried one of the beans and it even tastes soooo different than the can. I may never eat a canned garbanzo bean again… yea right. 🙂

I’m looking forward to trying this later today when its all done.  I’m going to add some red pepper flakes with olive oil ans cumin to the top.  Got some excellent multi-grain crackers from Crunchmaster to dip in it.  I’ll let ya know how it went.

EDIT:

I was out of garlic so I tried using garlic salt. DON’T! It was a great tasting flavor, just way to salty. Live and learn 🙂

Hummas

Hummas

Leave a comment

Filed under GF Cooking